


安装 docker
sudo apt install docker.io拉取镜像
sudo docker pull ros:humble构建开发环境镜像
mkdir dockerbuild # 进入一个空目录加速构建镜像
docker build -f Dockerfile.Dev -t ros:humble-dev . # 将下面内容拷贝到Dockerfile.Dev文件内再执行当前命名
FROM ros:humble # 更新源 RUN DEBIAN_FRONTEND=noninteractive apt-get update && apt-get upgrade -y # 安装 ROS 相关工具 RUN DEBIAN_FRONTEND=noninteractive apt-get install ros-$ROS_DISTRO-rviz2 -y RUN DEBIAN_FRONTEND=noninteractive apt-get install ros-$ROS_DISTRO-mapviz -y RUN DEBIAN_FRONTEND=noninteractive apt-get install ros-$ROS_DISTRO-swri-transform-util -y RUN DEBIAN_FRONTEND=noninteractive apt-get install ros-$ROS_DISTRO-image-transport -y RUN DEBIAN_FRONTEND=noninteractive apt-get install ros-$ROS_DISTRO-rqt -y RUN DEBIAN_FRONTEND=noninteractive apt-get install ros-$ROS_DISTRO-rqt-graph -y RUN DEBIAN_FRONTEND=noninteractive apt-get install ros-$ROS_DISTRO-rqt-common-plugins -y # 安装其他开发相关工具 RUN DEBIAN_FRONTEND=noninteractive apt-get install libgoogle-glog-dev -y RUN DEBIAN_FRONTEND=noninteractive apt-get install libeigen3-dev -y RUN DEBIAN_FRONTEND=noninteractive apt-get install python3-pip -y RUN DEBIAN_FRONTEND=noninteractive apt-get install zsh -y RUN DEBIAN_FRONTEND=noninteractive apt-get install filezilla -y RUN DEBIAN_FRONTEND=noninteractive apt-get install expect -y RUN DEBIAN_FRONTEND=noninteractive apt-get install tmux -y RUN DEBIAN_FRONTEND=noninteractive apt-get install gdb -y RUN DEBIAN_FRONTEND=noninteractive apt-get install ffmpeg -y RUN DEBIAN_FRONTEND=noninteractive apt-get install libsdl2-dev -y RUN DEBIAN_FRONTEND=noninteractive apt-get install yasm -y RUN DEBIAN_FRONTEND=noninteractive apt-get install nasm -y RUN DEBIAN_FRONTEND=noninteractive apt-get install net-tools -y RUN DEBIAN_FRONTEND=noninteractive apt-get install xterm -y RUN DEBIAN_FRONTEND=noninteractive apt-get install docker.io -y RUN DEBIAN_FRONTEND=noninteractive apt-get install vim -y RUN DEBIAN_FRONTEND=noninteractive apt-get install fonts-droid-fallback -y RUN DEBIAN_FRONTEND=noninteractive apt-get install ttf-wqy-zenhei -y RUN DEBIAN_FRONTEND=noninteractive apt-get install ttf-wqy-microhei -y RUN DEBIAN_FRONTEND=noninteractive apt-get install xfonts-wqy -y RUN DEBIAN_FRONTEND=noninteractive apt-get install ccache -y RUN DEBIAN_FRONTEND=noninteractive apt-get install curl -y RUN DEBIAN_FRONTEND=noninteractive apt-get install gdb -y RUN DEBIAN_FRONTEND=noninteractive apt-get install tree -y RUN DEBIAN_FRONTEND=noninteractive apt-get install zip -y RUN DEBIAN_FRONTEND=noninteractive apt-get install htop -y RUN DEBIAN_FRONTEND=noninteractive apt-get install git -y RUN DEBIAN_FRONTEND=noninteractive apt-get install psmisc -y RUN DEBIAN_FRONTEND=noninteractive apt-get install nautilus -y RUN apt autoremove -y # 设置 python 环境 RUN pip config set global.index-url http://pypi.tuna.tsinghua.edu.cn/simple RUN pip config set global.trusted-host pypi.tuna.tsinghua.edu.cn RUN pip install rospkg netifaces geojson RUN ln -fs /usr/bin/python3 /usr/bin/python # 设置 ros 环境变量 RUN echo "source "/opt/ros/$ROS_DISTRO/setup.bash"" >> ~/.bashrc RUN echo "source /root/install/local_setup.bash > /dev/null 2>&1" >> ~/.bashrc # 设置 ssh 免密登录 RUN echo "StrictHostKeyChecking no" >> /etc/ssh/ssh_config RUN echo "UserKnownHostsFile /dev/null " >> /etc/ssh/ssh_config # 设置工作目录 WORKDIR /root/进入ros2工作目录下的
src目录如果有nvidia显卡的,请移步nvidia-docker安装
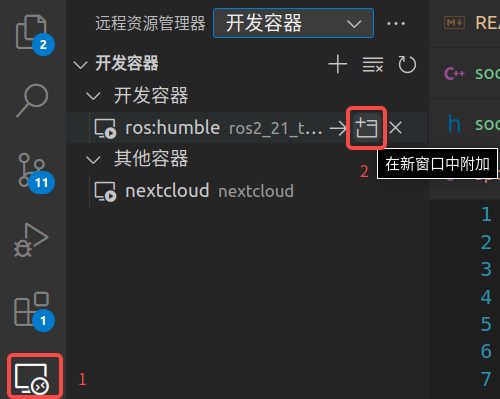
执行下面命令,启动容器,将
src目录挂载到开发容器中export work_name=$(basename $(pwd)) NVIDIA_DOCKER_ARGS="--gpus=all -v /usr/lib/nvidia:/usr/lib/nvidia --device /dev/dri -e DISPLAY=$DISPLAY -e NVIDIA_VISIBLE_DEVICES=all -e NVIDIA_DRIVER_CAPABILITIES=all" nvidia-smi > /dev/null 2>&1 || { NVIDIA_DOCKER_ARGS="" } docker run -tid --entrypoint=/bin/bash --net=host --privileged --device=/dev/video0 \ -v /var/run/docker.sock:/var/run/docker.sock \ -v /tmp/.X11-unix:/tmp/.X11-unix \ -v /dev/dri/card0:/dev/dri/card0 \ -e HOME_DIR=${work_name} \ -e DISPLAY=$DISPLAY \ ${NVIDIA_DOCKER_ARGS} \ -v $(pwd):/root/src/${work_name} \ -v /home/$USER/.ssh:/root/.ssh:ro \ -v $(pwd)/.vscode-server:/root/.vscode-server \ -w /root/src/${work_name} \ --name ${work_name}_dev \ ros:humble-dev xhost + # 打开容器可视化界面的权限通过VSCode进入容器内
版权归属:
billy
许可协议:
本文使用《署名-非商业性使用-相同方式共享 4.0 国际 (CC BY-NC-SA 4.0)》协议授权
评论区